Sunday, September 22, 2013

Propagating Succulents

My succulent is exploding from its container. Out of all the plants in my container garden, it is the happiest in this climate. After reading on Succulent & Sunshine that succulent trimmings can propagate into individual clones of the original plant, I decided to give it a try (and put off repotting for another week or so).

Propagating succulents is actually quite simple. The important thing to remember is that succulents need to heal before begin put into potting soil.

Step 1: Cleanly snap off rosettes or leaves from your succulent.
Step 2: Place in a cool, dry place out of the sun. Watch for the "open wound" to scab over.
Step 3: Pot in a container fill with potting soil. Water, allowing the soil to dry between watering.

Rosettes and leaves


Hopefully my succulent rosettes and leaves heal up. It could take up to 4 weeks! I'll be sure to post pictures of them if it works!


Rabbit Munching on a Snack

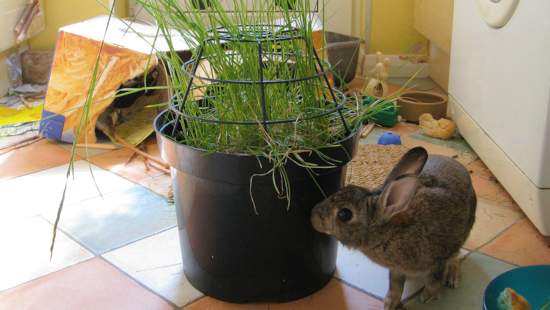
I have been trying to capture a good photo of the bunnies enjoying their homegrown grass. The little buggers just move so fast! Here's one...hope the next few will be more clear!


Thursday, September 19, 2013

Growing Grass Part 2

The weather these past couple of days has just been gorgeous. My grass seeds have begun to sprout starting with the clover seeds!
Can't wait to see what this'll look like tomorrow!

The styrofoam cup is ready for a trim!

 The rabbits munched on the grass in this pot two days ago. Here it is already partially recovered.


Tuesday, September 17, 2013

Growing Grass in the Desert

Finding a green patch of grass for the rabbits to graze in is a challenge in El Paso! During the summer rains, it's possible to cut grass just growing around the neighborhood (not on private property). With the seasonal rain coming to an end, however, I've been looking for another source of fresh grass.

I found this wonderful idea from therabbithouse.com, a blog from the UK (where rabbits are the third most popular pet, not including fish).


I decided to do a something similar on a smaller scale. The seeds are from Peaceful Valley, a company that sells organic heirloom and conventional seeds. Since rabbits and horses have a similar diet, I chose Premium Horse Pasture Mix. (If you are trying this for your own rabbits, make sure to buy a mix without alfalfa as this grass is not good for rabbits.) It cost about $4 for one pound + $10 for shipping. (I know! The shipping is much more expensive than the seed, but after looking at quite a few websites, this is the best price for getting just one pound of organic seed.)


Texas has not yet banned styrofoam cups.
Here is one from a popular local barbecue, recycled.
The grass in this pot was pretty much eaten down to
a nub. It's back after just a week!
Each time the grass gets eaten down to about an inch or so above the soil, it takes about a week for the grass to grow tall enough to be a significant snack. To make sure the rabbits could snack on grass every two days or so, I decided to plant a few more containers.


I started by puncturing holes in some yogurt and take out containers. An easy way to get through tough plastic is to heat up a bent paperclip with a lighter before pressing it through the bottom of the container. Rabbit poop is great fertilizer, so I decided to use some of it to act as a drainage material. There are some pellets of litter in there too, but since it's recycled newspaper, I don't think it's a big deal. 

The faded watering can is a testament to the merciless sun in El Paso.
Keep the grass in the shade!

The yogurt tape is covered with Washi tape. Cute!
Fill with regular potting soil and sprinkle with grass seed. The 1 lb. bag is meant to be spread over acres, so don't let the seeds fall too densely.


Water heavily the first time, and lightly in the morning and the evening. In the El Paso area, the sun is pretty merciless, so make sure the grass doesn't get too much.

And that's it! Check back in a few days to see the results!

Monday, September 9, 2013

Hello Again from El Paso

It's been a long time, but I'm back!

I left off last year after moving from Seoul, Korea, to El Paso, Texas. It has been a big, big change! I'm working as a preschool/pre-kindergarten teacher at a lovely small private school and taking graduate courses in Education at University of Texas at El Paso. The first year I was just swamped with juggling everything, but I am hoping to get back to writing this year.

Aside from a change in location, things haven't changed much. I posted some photos below of Franklin State Park, right smack in the middle of the City of the Sun. Enjoy and check back for more posts about crafting, cooking, and traveling.


Landscape and color scheme typical of the area. Beautiful pale greens and shades of earth.


These plants dot the landscape for miles around El Paso. 


Gorgeous lichen clinging to boulders along the trail.


The radio towers at the peak.

If you're thinking of hiking in Franklin State Park, make sure to choose a cool day or get started very early in the morning. The trail is not too difficult, but the sun can be brutal. Wear sunblock, bring water, sunglasses, and a handkerchief (it gets sweaty!). 

Tuesday, November 1, 2011

Weekend Eats

It's hard to admit, but sometimes children's snacks inspire my weekend meals. A sparse ham sandwich has been making a daily trip in one of my little girls' snack boxes for the past few weeks. This is my grown up version.


And what is a sandwich without a good salad?


Eli and I were lucky to find arugula at the local grocery store, Sahruga.

The recipes are as follows:


Ham Sandwich

1/2 round of rye bread from Peter Pan Bakery
2 packets of sandwich ham
2 handfuls of arugula
Cheddar cheese
Dijon mustard
Mayonnaise

Slice the bread into thick pieces. Spread one side with Dijon mustard and layer thickly with ham. Lay the cheese on top and put the two sides together. Slide the sandwiches into the oven or toaster oven on a cookie sheet. If possible, press the sandwiches down with a pizza tile.

While the sandwiches are toasting, wash and dry the arugula. Once the bread is toasty on both sides, pull them out. Add arugula and mayonnaise to taste.

Makes enough for 2 hungry people.


Caprese Salad on Arugula

1 small Mozzarella ball
2 small, ripe tomatoes
2 handfuls of arugula
1/2 can of whole pitted black olives
1/2 lemon
Basil
Extra virgin olive oil
Salt
Freshly ground pepper

Wash and dry arugula. Drizzle with extra virgin olive oil and sprinkle with salt. Squeeze the lemon over the arugula. Lay the tomato and mozzarella slices on the bed of greens. Chop the basil finely and sprinkle over the top. Add more olive oil and salt and pepper to taste. Arrange the olives around the tomatoes and cheese.

Monday, October 24, 2011

Jillian Tamaki for Penguin

The other day, I was clicking through one of my new favorite sites - Purlbee.com - when I saw this gorgeous piece of artwork.


This is one of three beautiful covers artist Jillian Tamaki has created for the re-issue of three Penguin classics: Black Beauty, Emma, and The Secret Garden. The power of this cover in particular really draws me in. Lately I've been leaning more and more towards textiles and fibers in my crafting and it is awe-inspiring to see the things that can be done with a little thread!

You can check out the original post at Purlbee.com or head over to Jillian Tamaki's personal site. Be prepared to slip into a beautiful world!
Related Posts Plugin for WordPress, Blogger...